Sunday, October 24, 2010

Ten Tips to Keep your Computer Running Smoothly


1. Never, never, turn your computer off with the power switch until Windows has shut down.

The one exception to this rule is when your computer locks up and your hard drive is not running (hard drive light is not blinking). In this situation, you can turn the power off without harmful effects to the hard drive. As cutting the power can also result in lost data or Windows files, you should only do this when you have to.

Following this rule will prevent permanent hard drive defects caused by the hard drive heads contacting the surface of the drive disc, and it will prevent a host of Windows problems.
Whenever possible, recover from crashes by pressing the Ctrl + Alt + Delete keys at the same time. Press them again to reboot your computer.

2. I highly recommend that you purchase an UPS (uninteruptable power supply) for your computer. This will keep your computer from crashing during power outages, and will protect your computer from low and high voltage occurrences.
An UPS is far superior to a surge protector and will save your computer from almost any type of power disaster. (See #1 above for what happens when your computer crashes.)

3. Backup, backup, backup, any data you cannot afford to lose to at least two separate physical drives. So backup data to external hard drives, Zip disks, CD-RWs etc.
The time to backup is when you create something you can't afford to lose. Don't wait until tomorrow.

4. Run Scandisk and Defragment at least once a month. This will keep your hard drive healthy and prevent crashes. Alternatively, purchase Norton Utilities and use it to keep your hard drive healthy.

5. Never unplug peripherals from the computer when it is powered up. Unplugging with the power on can short out the connector socket or the motherboard.

The only exception to this rule is if you know a peripheral is "hot pluggable". If you do not know what "hot pluggable" means then ignore this exception.

6. Do keep at least 300 MBs of your C: drive free for Windows to use. If you use Windows XP or Vista then you should have 400-600 MBs of free space on your C: drive.
If you do not have enough free space you will choke Windows and it will start dumping data to your hard drive, or it will just get really, really, slow.
Use the ADD/Delete tool in the Windows Control Panel to delete unneeded programs from your drive.
You can also use Cleansweep included in Norton Utilities to clean up your drive. If you do use Cleansweep or another hard drive cleaner, do not delete shared files unless you back them up. The cleaners do a rotten job of knowing if another program uses shared files.

7. Do not let a lot of programs load up when you start your computer. They use valuable memory and Windows Resources (Windows internal workspace).
All programs in your Windows System Tray (in the lower left of your screen) are running on your computer. Close them if you don't need them or run them and configure them not to load when you boot up.
Other programs running in the background can be found by pressing Ctrl + Alt + Delete at the same time.

8. Do use a virus checker regularly. Everyone should use a virus checker. The best type of protection is continuous monitoring from a dedicated anti-virus program like Norton Antivirus
The second best thing is to use is the free online virus checkers such as Housecall provided by Trend Micro.

9. If you have a high speed Internet connection you need a firewall program. A firewall program keeps those who want to hijack your computer from gaining access to your system. You really do not want someone else running your computer.
I suggest you purchase and run Norton's Personal Firewall program. Your firewall should boot up with your computer to protect it from invasion.

Case in point: When I am online 10 hours or more with my DSL connection, my computer is usually attacked by a hacker at least once.
Do not think you are safe from hackers!! Hackers use search programs to seek out computers at random. Get a firewall program and use it.

10. Keep track of the software disks you receive with your computer and new peripherals. These disks contain valuable software drivers and programs for Windows and are needed when Windows must be reloaded. Keep these disks and your Windows software disks in a safe, dry, place -- you never know when you will need them.

By doing this things you will really feel the computer..."HAPPY COMPUTING"


Saturday, October 23, 2010

Invisible in Gtalk

We all miss one of the great awaited feature of how to set invisible status in gtalk. Just like yahoo messenger invisible status in gtalk will allow you to be online without being bugged by gtalk friends when you are at work or don’t feel like to be annoyed by your gtalk friends.

But the regular gtalk version provided by google does not allow you to be in invisible mode when you are logged in.

Normal gtalk has no option to became Invisible.But in the Google talk labs Edition provide this facility


Invisible In Google Talk With Google Talk Labs Edition

In order to get invisible with gtalk only then you need to install a some what different version of gtalk called gtalk labs edition.

To download Google Talk Labs Edition Click here
By downloading this your problem will solve....

Friday, October 22, 2010

HOW TO DOUBLE THE SPEED OF MOZILA FIREFOX

To double the browsing speed of Mozilla Firefox do the below procedures

1. Type about:config in the address bar and then press Enter.

2. In the filter search bar type network.http.pipelining. Be sure the value field is set true,if not double-click to set true.

HTTP is the application-layer protocol that most web pages are transferred with. In HTTP 1.1, multiple requests can be sent before any responses are received. This is known as pipelining. Pipelining reduces page loading times, but not all servers support it.

3. Go back to the filter search bar and type network.http.pipelining.maxrequests. Double-click this option and set its value to 8.

4. In the filter search bar and type network.http.proxy.pipelining. Once opened double-click on it and set it to true.


5.
In IPv6-capable DNS servers, an IPv4 address may be returned when an IPv6 address is requested. It is possible for Mozilla to recover from this misinformation, but a significant delay is introduced.
Type network.dns.disableIPv6 in the filter search bar and set this option to true by double clicking on it.

6. CONTENT INTERRUPT PARSING
This preference controls if the application will interrupt parsing a page to respond to UI events. It does not exist by default.
Right-click (Apple users ctrl-click) anywhere in the about:config window, select New and then Boolean from the pop-up menu. Then:

A. Enter content.interrupt.parsing in the New boolean value pop-up window and click OK

B. When prompted to choose the value for the new boolean, select true and click OK.

7. Rather than wait until a page has completely downloaded to display it to the user, Mozilla applications will regularly render what has been received to that point. This option controls the maximum amount of time the application will be unresponsive while rendering pages.

Right-click (Apple users ctrl-click) anywhere in the about:config window, select New and then Integer from the pop-up menu.

A. Enter content.max.tokenizing.time in the New integer value pop-up window and click OK

B. You will be prompted to enter a value. Enter 2250000 and click OK.

8. CONTENT NOTIFY INTERVAL

This option sets the minimum amount of time to wait between reflows. Right-click (Apple users ctrl-click) anywhere in the about:config window, select New and then Integer from the pop-up menu.

A. Type content.notify.interval in the New integer value pop-up window and click OK.

B. You will be prompted to enter a value. Enter 750000 and click OK.

9. CONTENT NOTIFY ONTIMER

A. This option sets if to reflow pages at an interval any higher than that specified by content.notify.interval. Right-click (Apple users ctrl-click) anywhere in the about:config window and select New and then Boolean from the pop-up menu.

B. Type content.notify.ontimer in the New boolean value pop-up window and click OK.

C. You will be prompted to choose the value for the new boolean. Select true and click OK.

10. Notify Backoffcount
This option controls the maximum number of times the content will do timer-based reflows. After this number has been reached, the page will only reflow once it is finished downloading. Right-click (Apple users ctrl-click) anywhere in the about:config window and select New and then Integer from the pop-up menu.

A. Enter content.notify.backoffcount in the New integer value pop-up window and click OK.

B. You will be prompted to enter a value. Enter 5 and click OK.

11. CONTENT SWITCH THRESHOLD
You can interact with a loading page when content.interrupt.parsing is set to true. When a page is loading, the application has two modes: a high frequency interrupt mode and a low frequency interrupt mode. The first one interrupts the parser more frequently to allow for greater UI responsiveness during page load.

The low frequency interrupt mode interrupts the parser less frequently to allow for quicker page load. The application enters high frequency interrupt mode when you move the mouse or type on the keyboard and switch back to low frequency mode when you had no activity for a certain amount of time. This preference controls that amount of time. Right-click (Apple users ctrl-click) anywhere in the about:config window and select New and then Integer from the pop-up menu.

A. Enter content.switch.threshold in the New integer value pop-up window and click OK.

B. You will be prompted to enter a value. Enter 750000 and click OK.


12. NGLAYOUT INITIALPAINT DELAY

Mozilla applications render web pages incrementally, they display what’s been received of a page before the entire page has been downloaded. Since the start of a web page normally doesn’t have much useful information to display, Mozilla applications will wait a short interval before first rendering a page. This preference controls that interval. Right-click (Apple users ctrl-click) anywhere in the about:config window and select New and then Integer from the pop-up menu.

A. Enter nglayout.initialpaint.delay in the New integer value pop-up window and click OK.

B. You will be prompted to enter a value. Enter 0 and click OK

Thanks to: pctipsbox.com

Wednesday, October 20, 2010

Show Hibernate Button on Shutdown Permanently

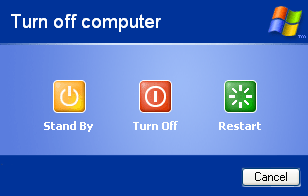
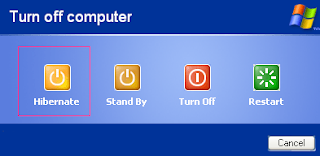
For all those users who like to Hibernate their system quite frequently but don’t like pressing the Shift key to get the Hibernate option, here is a quick article that will help you display all the four buttons of Turn off, Restart, Stand By and Hibernate together in the Shutdown menu
Before:


After:


The above screen shots would have told you what this post is going to do, so if you feel your computer also needs the Hibernate button by default, follow the steps.

Steps:

1. For this we need to make some changes in the registry.

2. I have created the reg file for you which you can download and double click after unzipping the archive. This will automatically add the Hibernate button as the fourth button by default.

3. But in case if you want to remove the option back to the default three buttons, then delete the entry ShowHibernateButton from HKEY_LOCAL_MACHINE\SOFTWARE\Policies\Microsoft\Windows\System\Shutdown key or use this reg file.

Now Hibernate button will not appear on Stand By when Shift key is pressed.


NOKIA MOBILE CODES


"Here's a list of codes for Nokia handsets, which will help you know and do a lot more with your mobile phone. But the codes might work well on a particular set and might not on the other, depending on the compatibility of your handset."

There is a lot more in the tiny thing you keep the closest to your heart (these days). Yes, here's a little extra information about your mobile phone, some applications that you probably didn't even know can be performed by this wonder.

The codes given below are strictly for Nokia handsets and might also vary depending on the compatibility of your Nokia phone. A number of codes might work on a particular Nokia handset, while might not on the other.

1)*3370#

Activates Enhanced Full Rate Codec (EFR) - Your phone uses the best sound quality but talk time is reduced by approx 5 per cent.

(2)#3370#

Deactivate Enhanced Full Rate Codec (EFR) OR *3370#

(3)*#4720#

Activate Half Rate Codec - Your phone uses a lower quality sound, but you would gain approx 30 per cent more talk time.

(4)*#4720#

Deactivate Half Rate Codec.

(5)*#0000#

Displays your phones software version, First Line: Software version; Second Line: Software release date, Third Line: Compression type.

(6)*#9999#

Phones software version if *#0000# does not work.

(7)*#06#

For checking the International Mobile Equipment Identity (IMEI Number).

(8)*#2640#

Displays security code in use.

(9)*#30#

Lets you see the private number.

(10)*#67705646#

Removes operator logo on 3310 and 3330.

(11)*#73#

Resets phone timers and game scores.

(12)*#746025625#

Displays the SIM clock status, if your phone supports this power saving feature "SIM Clock Stop Allowed", it means you will get the best standby time possible.

(13)*#7760#

Manufactures code.

(14)*#7780#

Restore factory settings.

(15)*#8110#

Software version for the nokia 8110.

(16)*#92702689#

Displays – 1. Serial number, 2. Date made, 3. Purchase date, 4. Date of last repair (0000 for no repairs), 5. Transfer user data. To exit this mode, you need to switch your phone off then on again in a number of phones

(17)*#94870345123456789 #

Deactivate the PWM-Mem.

(18)12345

This is the default security code.

Press and hold #. This lets you switch between lines.

MOUSE POINT FOUNDER


Are you fed up for searching mouse point on Windows Desktop ? Don't worry here is a solution
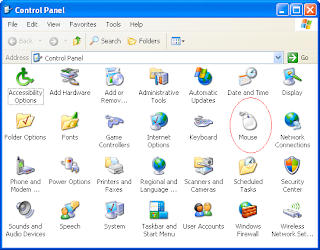
Go to "Control Panel
Select the "Mouse"
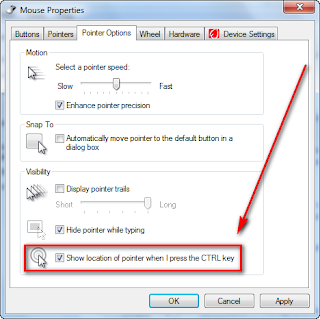
Click on the "Pointer Option Tab"
Under the "Visibility" Tick the box near to "Show location of pointer when I press the CTRL button"
Then click OK


After completing this when u click on Control Button you can see a round where the mouse point..

Tuesday, October 19, 2010

KEYBOARD SHORTCUTS FOR WINDOWS

For a smart and fast computing there are many keyboard short cuts in Windows.Here is a complete list of Working Windows Shortcuts

ACTION
WINDOWS XP/VISTA/7
Mac OS
KDE
GNOME
Activate Menu bar Alt Ctrl+F2
Alt+F1
File menu Alt+F
Alt+F Alt+F
Edit menu Alt+E
Alt+E Alt+E
View menu Alt+V
Alt+V Alt+V
Cycle through opened items Alt+Esc


Undo the last operation Ctrl+Z Cmd+Z Ctrl+Z Ctrl+Z
Redo the last operation Ctrl+Y Shift+ Cmd+Z Shift+Ctrl+Z Shift+Ctrl+Z
Cut the selected area and store it in the clipboard Ctrl+X or Shift+Del Cmd+X Ctrl+X Ctrl+X
Copy the selected area into the clipboard Ctrl+C, or Ctrl+Ins Cmd+C Ctrl+C Ctrl+C
Paste contents of clipboard at cursor Ctrl+V, or Shift+Ins Cmd+V Ctrl+V Ctrl+V
Paste special Ctrl+Alt+V
Ctrl+ Shift+V Ctrl+ Shift+V
Select everything in focused control or window Ctrl+A Cmd+A Ctrl+A Ctrl+A
Toggle between installed keyboard languages Shift+Alt Cmd+Space (activates Spotlight instead on OS X ≥ v10.4)

Text editing

Many of these commands may be combined with Shift to select a region of text.[1]

ACTION
WINDOWS XP/VISTA/7
MAC OS
KDE
GNOME
delete char to the right of cursor Del fn+← Backspace
Del
start of line Home Cmd+ or Ctrl+A Home Home
end of line End Cmd+ or Ctrl+E End End
end of document Ctrl + End Cmd+ Ctrl + End Ctrl + End
previous word Ctrl+ Opt+ Ctrl+ Ctrl+
next word Ctrl+ Opt+ Ctrl+ Ctrl+
previous line break Ctrl+ Opt+ Ctrl+ (kword) Ctrl+
next line break Ctrl+ Opt+ Ctrl+ (kword) Ctrl+
search Ctrl+F Cmd+F

Cmd+E (Search with current selection)


Ctrl+F

Ctrl+K (interactive search)

next search result F3 Cmd+G
Ctrl+G
previous search result Shift+F3 Shift+ Cmd+G
Shift+Ctrl+G
search and replace Ctrl+H Cmd+F
Ctrl+H

Web browsers

ACTION
WINDOWS XP/VISTA/7
MAC OS
KDE
GNOME
Bookmarks menu Ctrl+B Cmd+B (Firefox) Alt+B Alt+B
URL Shortcuts (Adds www. + .com) Ctrl+ Enter Ctrl+ Enter Ctrl+ Enter Ctrl+ Enter
URL Shortcuts (Adds www. + .org) Ctrl+ Shift+ Enter Shift+ Cmd+ Enter Ctrl+ Shift+ Enter Ctrl+ Shift+ Enter
URL Shortcuts (Adds www. + .net) Shift + Enter Shift + Enter Shift + Enter Shift + Enter
Add bookmark for current page Ctrl+D Cmd+D Ctrl+B Ctrl+D
Manage bookmarks Ctrl+B Cmd+ Opt+B (Chrome/Safari) or Cmd+ Shift+B (Firefox) Ctrl+ Shift+R Ctrl+B
Web Search Ctrl+E Cmd+E

Focus and Select Address Bar Ctrl+L or F6 Cmd+L Ctrl+L or F6
Refresh a Webpage F5 or Ctrl+R Cmd+R F5 or Ctrl+R F5 or Ctrl+R
Open a New Tab Ctrl+T Cmd+T Ctrl+T
Close a Current Tab Ctrl+W Cmd+W Ctrl+W
Zoom Options (zoom in +, zoom out -, zoom 100%) Ctrl++ and Ctrl+- and Ctrl+0 Cmd++ and Cmd+- and Cmd+0 Ctrl++ and Ctrl+- and Ctrl+0 Ctrl++ and Ctrl+- and Ctrl+0

Go menu

Action↓ Windows XP / Vista / 7↓ Mac OS↓ KDE↓ GNOME↓
Go to Browser Alt+D or Alt+C

according language

Cmd+L

Go to the previous location in history Alt+ or ← Backspace(Internet Explorer) Cmd+[ or Cmd+ Alt+ Alt+
Go to the next location in history Alt+ Cmd+] or Cmd+ Alt+ Alt+
Go up one level in the navigation hierarchy Alt+(Vista only) or ← Backspace(Windows Explorer) Cmd+ Alt+ Alt+
Go to the starting page defined by the user or application Alt+Home Cmd+Home Ctrl+Home Alt+Home

Text formatting

Action↓ Windows XP / Vista / 7↓ Mac OS↓ KDE↓ GNOME↓
Make selected text bold/regular Ctrl+B Cmd+B Ctrl+B Ctrl+B
Toggle underlining of selected text Ctrl+U Cmd+U Ctrl+U Ctrl+U
Make selected text italic/regular Ctrl+I Cmd+I Ctrl+I Ctrl+I
Change to upper/lower case Shift+F3 Opt+ Cmd+C

Make selected text superscript Ctrl+ Shift++


Make selected text subscript Ctrl++


Window management

Action↓ Windows XP / Vista / 7↓ Mac OS↓ KDE↓ GNOME↓
Switch to next/previous focused window Alt+Tab /

Shift+Alt+Tab

Cmd+Tab /

Shift+ Cmd+Tab

Alt+Tab Alt+Tab /

Shift+Alt+Tab

Switch focus to the next/previous window (without dialog) Alt+Esc /

Shift+Alt+Esc

Cmd+` or Ctrl+F4

(or fn+Ctrl+F4 on some systems)


Alt+Esc /

Shift+Alt+Esc/mini

Switch focus to the next/previous tab within a window
Ctrl+Tab

Switch focus to the next/previous panel on the desktop


Ctrl+Alt+Tab / Shift+Ctrl+Alt+Tab
Switch focus to the next/previous panel (without dialog)


Ctrl+Alt+Esc /

Shift+Ctrl+Alt+Esc

Pop up window menu Alt+Space
Alt+F3 Alt+Space
Close the focused window Alt+F4 or Ctrl+F4 or Alt+Space then C or Ctrl + W Cmd+W Alt+F4 Alt+F4
Restore the focused window to its previous size Alt+Space then R

Alt+F5
Move the focused window Alt+Space then M then Arrow Keys
Alt+Mouse /

Alt+F3 then M then Arrow Keys

Alt+Mouse /

Alt+F7 then Arrow Keys

Resize the focused window Alt+Space then S then Arrow Keys
Alt+F3 then S then Arrow Keys Alt+F8 then Arrow Keys
Hide the focused window
Cmd+H

Minimize the focused window Alt+Space then N, or Win+ (Windows 7 only) Cmd+M
Alt+F9
Maximize the focused window Alt+Space then X, or Win+ (Windows 7 only)

Alt+F10
Maximize horizontally


Maximize vertically Win+ Shift+ (Windows 7 only)


Minimize all Win+M or Win+D Cmd+Alt+M Available, but no default Ctrl+Alt+D
Minimize all non focused windows Win+Home (Windows 7 only?)
Available, but no default
Undo minimize all Shift+ Win+M
Available, but no default Ctrl+Alt+D
Switch fullscreen/normal size F11
F11 F11
Show the window in full screen mode, with no border, menubar, toolbar or statusbar
Depends on application Ctrl+ Shift+F Ctrl+F11
Rollup/down window

Available, but no default Alt+F12
Show all open windows
F9

Show all windows of current application
F10

Show all workspaces
F8

Move window to left/right/up/down workspace Win+ctrl+arrow keys

Ctrl+Alt+ Shift+

/ / /

Move window to workspace n

Available, but no default
Switch to next/previous workspace
Cmd+Tab /

Cmd+ Shift+Tab


Switch to next/previous workspace list

'Available, but no default
Go to workspace n Win + D Ctrl+n Ctrl+Fn
Go to left/right/up/down workspace [2] Ctrl+ /

Ctrl+ / |Ctrl+ / |Ctrl+ (OS X ≥ 10.5 only)


Ctrl+Alt+ /

/ /

Show / hide desktop Win+D F11 Ctrl+Alt+D Ctrl+Alt+D user specific, no default
Activate window demanding attention


Kill application of current window Alt+F4 or Ctrl+F4 varies [3] Cmd+Q [4] Ctrl+Alt+Esc
Close dialog Esc Esc

Open/Focus (preview) pinned program on the taskbar Win+(#) where "#" is the position of the program on the Windows 7 Taskbar (Windows 7 only)


Open new program window of the pinned program on the taskbar (if program is already opened) Win+ Shift+(#) where "#" is the position of the program on the Windows 7 Taskbar (Windows 7 only)


Focus the first taskbar entry. Pressing again will cycle through them Win+T , you can can back and forth. Hold Shift to cycle backwards (Windows 7 only)


Peek at the desktop Win+Space (Windows 7 only) F11

Bring gadgets to the front of the Z-order Win+G (Windows 7 only)


Open the Run dialog box Win+R (Windows XP,7)


Open the Search dialog box Win+F (Windows XP,7)


External display options (mirror, extend desktop, etc.) Win+P (Windows 7 only)


Widget navigation

Action↓ Windows XP / Vista / 7↓ Mac OS↓ KDE↓ GNOME↓
Moves keyboard focus to next/previous control Tab / Shift+Tab
Tab / Shift+Tab Tab / Shift+Tab

Ctrl+Tab / Shift+Ctrl+Tab

Pop up tooltip for currently focused control Shift+F1

Ctrl+F1
Show context-sensitive help for currently focused window or control Shift+F1 Cmd+? Shift+F1 Shift+F1
Give focus to next/previous pane Ctrl+F6 / Alt+F6 Cmd+`
F6 / Shift+F6
Give focus to splitter bar in paned window


F8
Give focus to window's menu bar F10 or Alt Ctrl+F2 Alt F10
Pop up contextual menu for currently selected objects (aka context menu) Shift+F10 or Menu Varies with laptop / extended keyboard type; enable Mouse keys in Universal Access, then Function+Ctrl+5 or Ctrl+5 (numeric keypad) or Function+Ctrl+i (laptop) Menu Shift+F10
Toggle selected state of focused checkbox, radio button, or toggle button Space Space Space Space
Activate focused button, menu item etc. Enter Space (also Enter for menu items) Enter Enter
Select/move to first/last item in selected widget

Home / End Home / End
Scroll selected view by one page up/left/down/right
/
PageUp / Ctrl+PageUp /
PageDown / Ctrl+PageDown
Scroll selected view to top/bottom
or on MacBook Pro Fn + Opt +

or on MacBook Pro Fn + Opt +


Tab management

Action↓ Windows XP / Vista / 7↓ Mac OS↓ KDE↓ GNOME↓
Create new tab Ctrl+T Cmd+T Ctrl+ Shift+N or Ctrl+ Shift+T or Ctrl+T Ctrl+T
Close current tab Ctrl+W Cmd+W Ctrl+ Shift+W Ctrl+W
Go to next/previous tab Ctrl+Tab / Ctrl+ Shift+Tab Cmd+{ / Cmd+} or Cmd+ Shift+ / Cmd+ Shift+ (Safari) Ctrl+, / Ctrl+. Ctrl+PageUp / Ctrl+PageDown

Desktop navigation

Action↓ Windows XP / Vista / 7↓ Mac OS↓ KDE↓ GNOME↓
Run new application Win+R Cmd+O Alt+F2 Alt+F2
Open new browser window with same page as current Alt+( D then Enter )

Ctrl+N (Explorer / Internet Explorer)

Cmd+N (Non-default user option in Safari)

Start menu / Access applications Win or Ctrl+Esc Cmd+A Alt+F1 Alt+F1
Lock desktop Win+L or Ctrl+Alt+Space Ctrl+ Shift+Eject (Snow Leopard) Ctrl+Alt+L Ctrl+Alt+L
Show desktop Win+D or
Win+M (then use Win+ Shift+M to bring back all windows)
F11 Ctrl+Alt+D Ctrl+Alt+D
Switch active user Win+L [5]
Ctrl+Alt+L
Task manager Ctrl+ Shift+Esc, Ctrl+Alt+Delete[6] Cmd+ Opt+Esc Ctrl+Esc
Rename file F2 Enter F2 F2

Making screenshots

Action↓ Windows XP / Vista / 7↓ Mac OS↓ KDE↓ GNOME↓
Save screenshot of entire screen as file
Shift+ Cmd+3 Print Screen Print Screen
Copy screenshot of entire screen to clipboard Print Screen or Ctrl+Print Screen Ctrl+ Shift+ Cmd+3
Save screenshot of window as file
Shift+ Cmd+4 then Space
Alt+Print Screen
Copy screenshot of window to clipboard Alt+Print Screen Ctrl+ Shift+ Cmd+4 then Space
Copy screenshot of arbitrary area to clipboard
Ctrl+ Shift+ Cmd+4

Save screenshot of arbitrary area as file
Shift+ Cmd+4

Command line shortcuts

Below is a list of common keyboard shortcuts that are used in a command line environment.

Action Microsoft Windows
(cmd.exe)
Microsoft Windows
(Windows PowerShell)
Unix/Linux/Mac OS X
(bash)
Unix/Linux/Mac OS X
(POSIX shell)
Scroll through History of typed commands / / / ESC K/ESC J
Signal end-of-file Ctrl+Z
Ctrl+D
Abort current command/typing Ctrl+C Ctrl+C Ctrl+C Ctrl+C
Erase word to the left

Ctrl+W
Erase word to the right

Alt+D
Erase line to the left Esc
Ctrl+U
Erase line to the right Esc Ctrl+End Ctrl+K
Yank/paste previously erased string

Ctrl+Y
Move one word to the left (backward) Ctrl+ Ctrl+ Alt+B
Move one word to the right (forward) Ctrl+ Ctrl+ Alt+F
Move to beginning of line Home Home Ctrl+A
Move to end of line End End Ctrl+E
Reverse search of history F7 F8 Ctrl+R
Stop execution of the current job

Ctrl+Z
Insert the next character typed verbatim

Ctrl+V
Autocomplete command/file name Tab (if enabled e.g. via TweakUI) Tab Tab (usually once) Esc (usually twice)
Scroll window up Shift+PageUp (older versions of Windows XP only)
Shift+PageUp
Scroll window down Shift+PageDown (older versions of Windows XP only)
Shift+PageDown

Accessibility

Action↓ Windows XP / Vista / 7↓ Mac OS↓ KDE↓ GNOME↓
Utility Manager Win+U

Sticky mouse (Ctrl+Alt+ Shift When your mouse goes wild and highlights from the place you clicked and you are unable to release it)


Inverse (Reverse Colors) Mode
Cmd+ Opt+Ctrl+8

User interface shortcuts

Below is a list of common keyboard shortcuts that are used to select a User interface (UI).

Action Microsoft Windows Linux
X11
Mac OS X
CLI
Ctrl+Alt+F1 to Ctrl+Alt+F6
GUI
Usually Ctrl+Alt+F7 or Ctrl+Alt+F8